Shopify - Test PDP Template
Table of contents
In short
With Varify, you can easily test alternative PDP templates for your Shopify store. To do this, first create a new PDP template with all the desired customizations. Create a new A/B test and add the JavaScript from this guide. No changes to products or Shopify settings are necessary.
Create new template
First create a new template for your product detail page (PDP). This allows you to test alternative arrangements, app widgets or other elements.
How to create a new template in just a few steps:
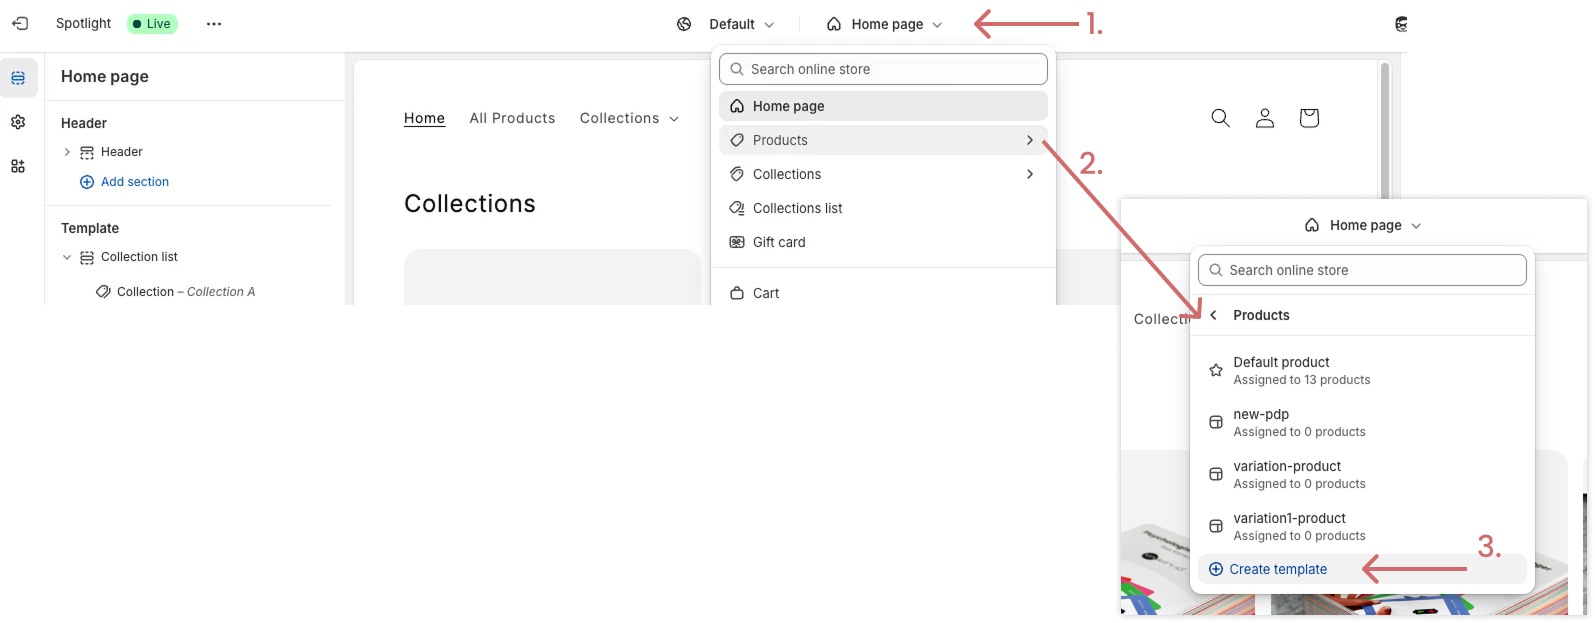
- Go to Online Store > Themes > Customize
- Click on the drop-down menu at the top, which is set to "Home page" by default
- Select the Products area in the dropdown
- Click on Create Template to create your new PDP template
Give the new template a name, such as: new-pdp.
Under "Based on", select the template you are currently using - it will serve as the starting point for your new template.

- Now make all the desired changes to the new template:
- Test widgets of a Shopify app
- Create new blocks, elements or texts
- Change the order of existing blocks
- Customize the color scheme
- and much more
- Then save the new version of your PDP template. It is not yet visible as your products are still set to the original template.
Create a new experiment in Varify
Create a new experiment on one of your product pages
Click on the code symbol at the top right
Select "Add JavaScript"
Insert the following JavaScript
In line 5, change the value of the constant pdpVariationName 'new-pdp' and replace it with the name of your new template
In lines 3 and 4, change the experiment and variant IDs to the IDs of the experiment accordingly. (Important: You must save the test once beforehand so that the IDs are created at all. You can then save it via Edit again and replace the IDs).
Save the experiment
					(function () {
  // ─── CONFIG ───
  const experimentId = 32898;
  const variationId = 49279;
  const viewValue = 'new-pdp'; //"view"-value (z.B. Template-Name)

  // ─── HELPERS ───
  if (window.varify.helpers.isInEditor()) {
    return
  }

  // ─── LOGIC ───
  const params = new URLSearchParams(window.location.search);
  const paramAsBase64 = btoa(`${experimentId}:${variationId}`).replace(/=/g, '');

  const needsView = params.get('view') !== String(viewValue);
  const needsVa = params.get('va-red') !== paramAsBase64;

  if (needsView || needsVa) {
    params.set('view', String(viewValue));
    params.set('va-red', paramAsBase64);

    const newUrl =
      `${window.location.origin}${window.location.pathname}?${params.toString()}${window.location.hash || ''}`;

    window.location.href = newUrl;
  }
})();
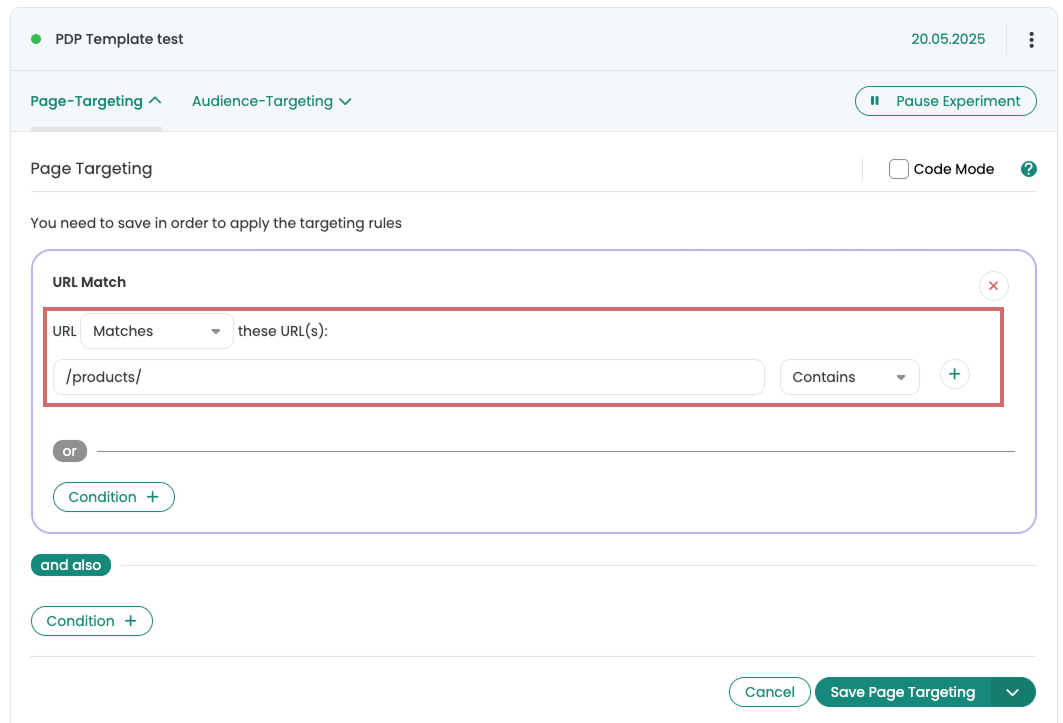
Configure and start experiment targeting
The experiment should be displayed on all product pages. Therefore, a small adjustment in page targeting is necessary.
Open the page targeting of the experiment
Set the targeting to /products/ with the matching type "Contains"
If your product detail pages are not clearly identifiable via the URL, you can also use a unique CSS selector that only appears on your PDPs. The "Buybox" selector is usually suitable for this.
Start the experiment