Creating Custom Click Events in GA4
Table of contents
In short
Varify.io® does not collect any data itself. Nevertheless, you can track click events on specific elements within your Varify experiments. In this section, we explain step by step how you can do this with Google Analytics 4.
Setup takes place in two phases: First, you send your event to GA4 (Step 1), then you configure it in GA4 (Step 2)—revenue events as key events, and numerical values additionally as custom metrics. To learn how to analyze the completed event, see the article „Analyzing Custom Events.”.
Step 1: Send a custom event to GA4
Recommended Approach: Send events via the existing tracking setup
We generally recommend sending custom events to GA4 using the same method you already use to track your events—that is, through your existing tracking setup:
- Is Google Tag Manager in use?, the custom events should be created via GTM and passed to GA4 (usually via the DataLayer and a corresponding GA4 event tag).
- Is GA4 integrated directly into the website? (without GTM), the custom events are sent in the same direct way.
This ensures that your tracking remains consistent and can be maintained in one central location. The click-event solution described below, which uses the „Add JS” feature, is intended as a supplement if you want to measure clicks on individual elements within a Varify experiment.
Click tracking on a specific element
The element only exists in your variant
To measure clicks on newly created elements in your variant, you must first define a unique selector for each element. IDs are particularly suitable for this.
A unique selector is for example: #my-btn
To adapt the JavaScript code for tracking clicks on your new element, you should first use the placeholder #my-btn in line 3 of the code with the actual selector of your element. You can use the "Add JS" function to do this. Follow these instructions:
Open the JavaScript editor in Varify: Open the window in the editor to insert JavaScript. You will find the code symbol at the top right.
Insert code: Paste the JavaScript code provided into the editor.
Replace selector: Find the placeholder in line 3
#my-btn. Replace#my-btnwith the actual selector of your new element. This could be an ID (for example1TP6New-button-id) or a class (for example.new-button-class).Save changes: Save the changes after replacing the selector.
					window.varify.helpers.onDomLoaded(() => {
    // Replace the CSS selector
    var cssSelector = "#my-btn";

    // Select only the first element with the .btn-primary class
    var element = document.querySelector(cssSelector);

    if (element) {
        element.addEventListener("click", VarifyTrack);
    }
});

function VarifyTrack() {
    if (typeof gtag === "function") {
        gtag('event', 'VarifyClick', {
            'VarifyClickCount': '1',
        });
        console.log("Event sent.");
    } else {
        console.log("gtag is not defined. Please check the GA integration.");
    }
}
The element already exists (in original and variant)
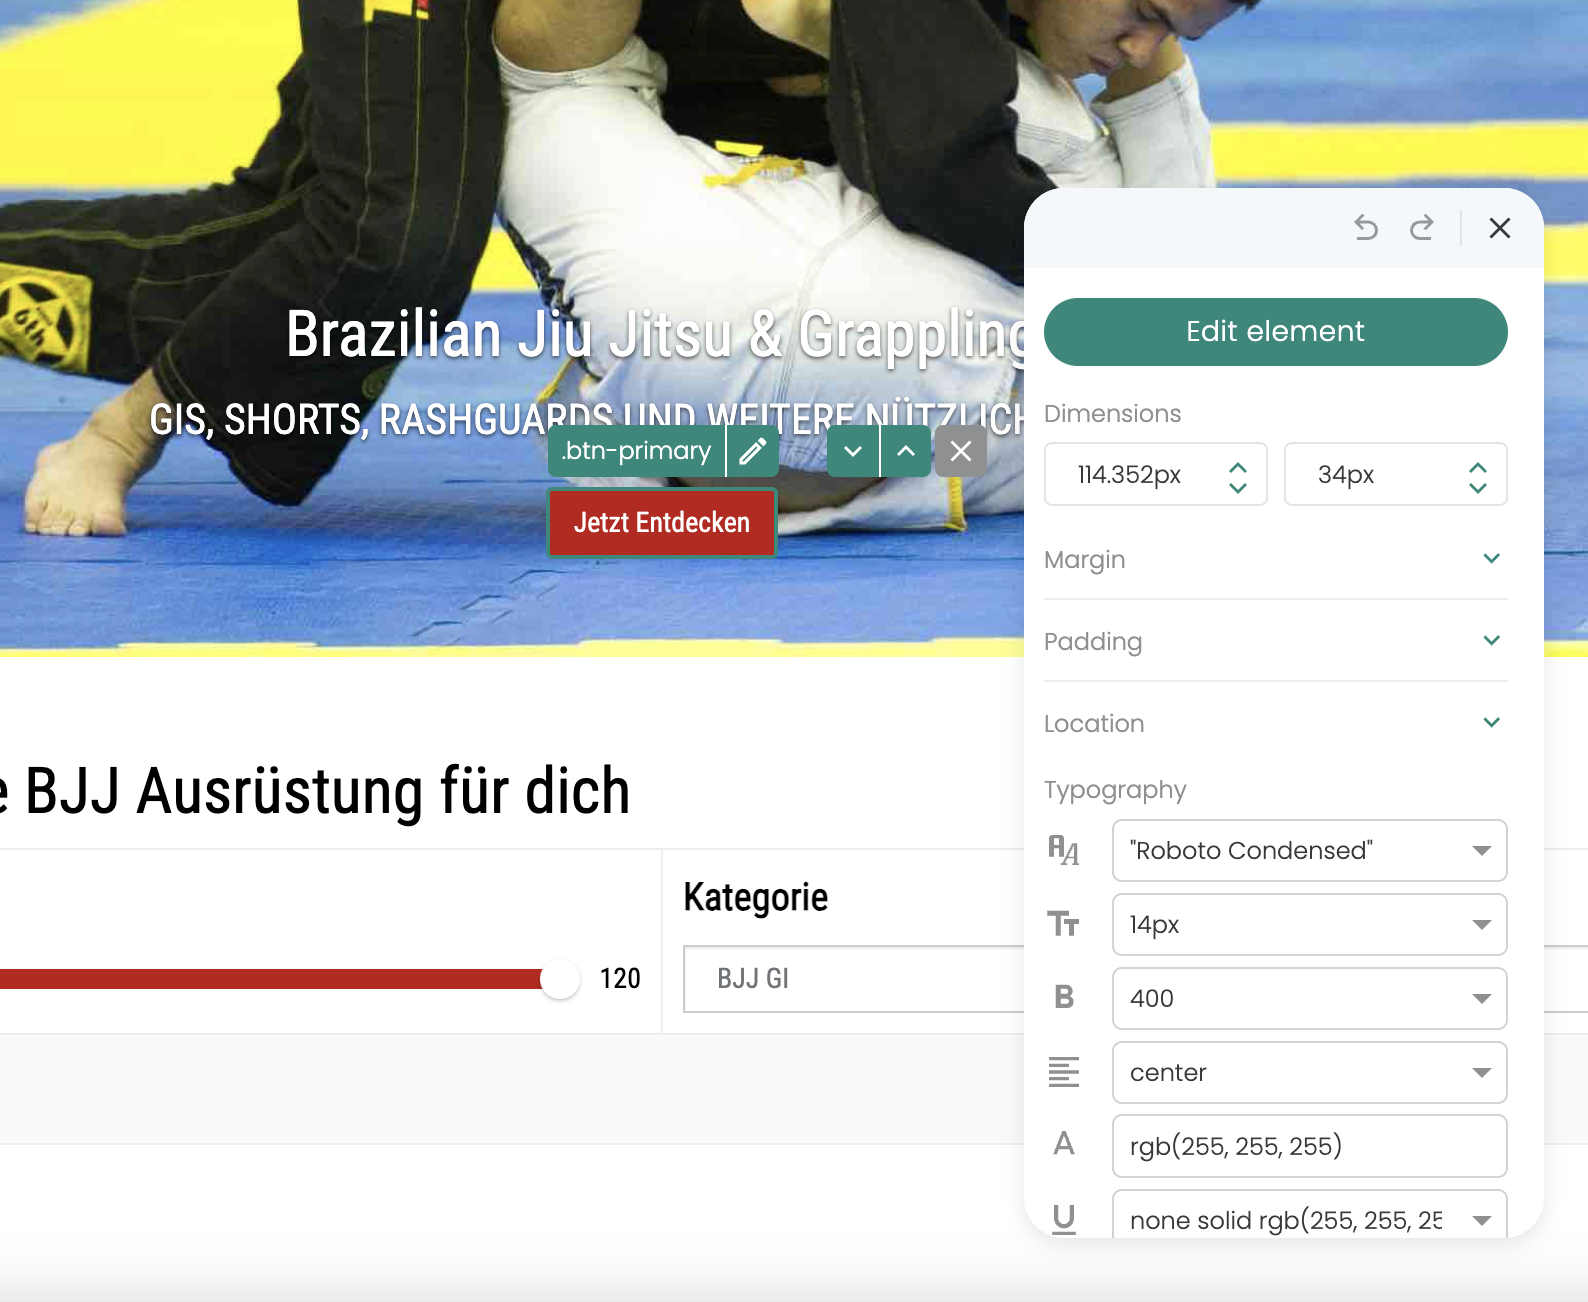
To measure clicks on elements that already exist on your website, it is important that you define a unique selector for each element. An effective way to determine such a selector is to use the visual editor of Varify.io.
The following is an example of a unique selector .btn-primary.
To track click events of already existing elements that occur both in the original and in the variant of your experiment, you can set up a special tracking experiment. Here is a customized guide:
Create new experiment: Create an experiment that is intended exclusively for tracking elements.
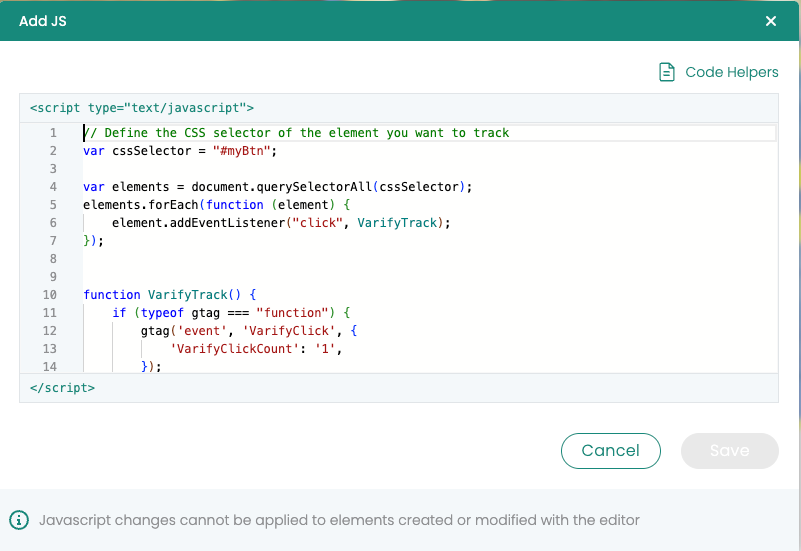
Add JavaScript code: Use the "Add JS" function to add the required JavaScript code to your variant. In line 3 of the code, replace the placeholder
.btn-primarywith the correct CSS selector of your element.Set page targeting: Set the page targeting for the experiment so that it is set to the homepage with a "Contains" matching type. This ensures that all pages of your website are included, so that the experiment is active on the entire site.
Adjust traffic distribution: The traffic distribution should be set to 100% for the variant to ensure that all users receive the tracking script.
Track click events: The clicks on the specified element are sent as an event to Google Analytics 4 (GA4) to be analyzed there.
					window.varify.helpers.onDomLoaded(() => {
    // Define the CSS selector of the element you want to track
    var cssSelector = ".btn-primary";

    var elements = document.querySelectorAll(cssSelector);
    elements.forEach(function(element) {
        element.addEventListener("click", VarifyTrack);
    });
});

function VarifyTrack() {
    if (typeof gtag === "function") {
        gtag('event', 'VarifyClick', {
            'VarifyClickCount': '1',
        });
        console.log("Event sent.");
    } else {
        console.log("gtag is not defined. Please check the GA integration.");
    }
}
Send Event Parameters in GTM
So that you can analyze the event later as a custom metric, it should send an event parameter to GA4. In the click event snippets above, this parameter is already included (VarifyClickCount).
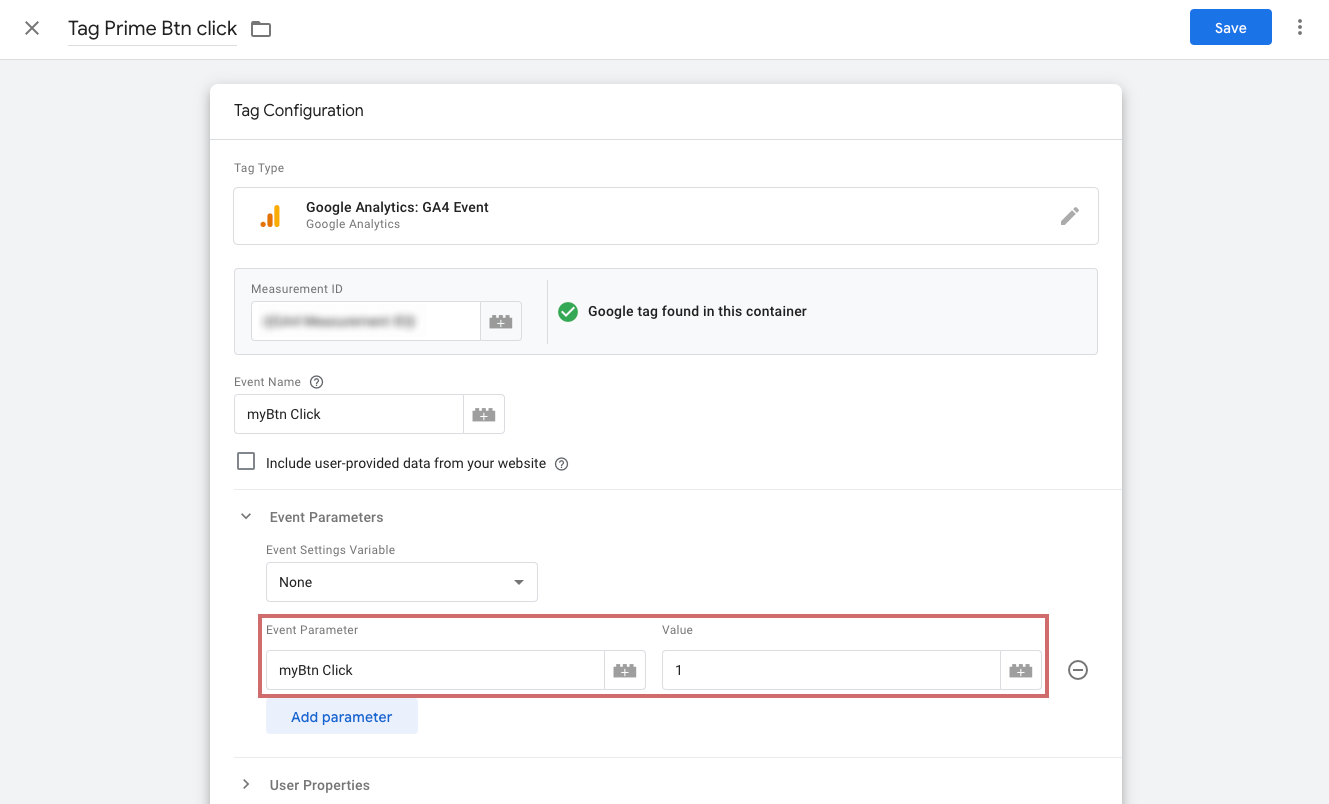
If you're tracking a custom event via GTM and it isn't sending any parameters yet, add them directly to the event:
- Open the tab „Event Parameters”.
- Click the blue button „Add Parameter”.
- Enter in the field „Event Parameters” Enter the name of the parameter.
- Wear underneath Value the number
1one (or, in the case of revenue events, the dynamic revenue value). - Publish the changes to the GTM container.
Step 2: Set up a custom event in GA4
Once your events are sent to GA4 correctly, they'll appear there automatically—without you having to create them manually. (It may take up to 24 hours for them to appear in the reports.)
That concludes the sending part—now we'll continue in GA4. Depending on your use case, set up your event there as follows:
- Revenue figures: as Key Event Select them so that they appear under "Key Events" in the Varify Result Report.
- Standard (numerical) metrics: in addition as Custom Metric Create them so that you can analyze them in the exploratory reports.
Mark Revenue Custom Events as Key Events
For a revenue custom event to appear under "Key Events" in the Varify Result Report and be selectable as a goal there, it must be marked as a key event in GA4. For other custom events (e.g., pure click events), this step is not necessary—they are available as goals anyway.
- In GA4, go to Administration → Events (or Key Events).
- Find your Revenue Custom Event and turn on the "Mark as Key Event" toggle.
- If the event hasn't been recorded yet, click "New Key Event" and enter the event name exactly as GA4 receives it.
Create Numeric Values as Custom Metrics
If you want to analyze the numerical value of an event (e.g., a count or quantity) in exploratory reports, create a custom metric in GA4. This requires that the event includes the corresponding parameter (see Step 1).
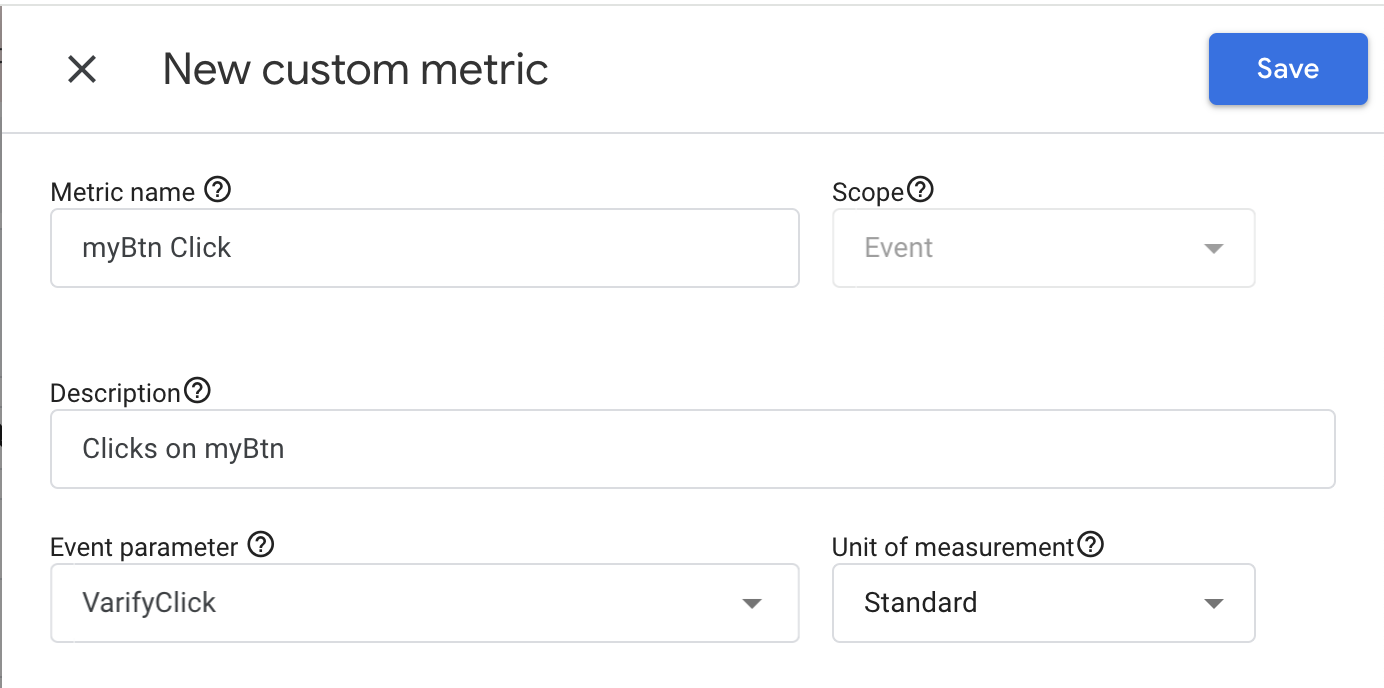
- In GA4, go to Admin → Custom Definitions → Custom Metrics → Create Custom Metric.
- Enter a descriptive name and, optionally, a short description.
- Select the event parameter from the drop-down menu or add it manually. Be sure to use the correct spelling.
- Leave it in the field „Unit of Measurement” usually set to „Standard” (for revenue: the appropriate currency unit) and save the custom metric.
It takes 24–48 hours for data to become available in the exploratory reports. Also note: Event data is not retroactive assigned to a custom metric. A custom metric begins collecting data only after it has been created.