GA4 integration via Shopify Custom Pixel
IMPORTANT NOTICE: These instructions should only be followed if you have integrated the Google Tag Manager via the Shopify Custom Pixel.
Table of contents
In short
In this guide, you will learn how to send Varify events to Google Analytics 4 via the Shopify Custom Pixel integration. You will learn how to send the Varify events to Google Analytics 4 either using the Google Tag Manager or via direct gtag integration.
Sending the Varify data via GTM or GTAG via the Shopify Custom Pixel
Step 1: Selection of the Analytics Connection "Shopify App / Custom Pixel"
Go to app.varify.io and click on “Go to tracking setup”. Then select “Google Analytics 4 (Shopify Custom Pixel Integration)" in the Tracking Setup Wizard. Follow the steps of the setup wizard. Only if you are already using GTM on your site is it necessary to follow the steps in option 1 below. If you have integrated GA directly without the GTM, please go directly to option 2.
Option 1: Google Tag Manager integration
Follow the steps in this guide if you have integrated the Google Tag Manager in your Shopify Custom Pixel. If you send your data directly via gtag - i.e. GA4 direct integration via Custom Pixel, please follow these steps Instructions.
Step 2: Add the varify analytics.subscribe function in the custom pixel of the GTM
Call up the "Customer events" area in the Shopify backend and open the custom pixel in which you have integrated your GTM.
The Varify event is created using the analytics.subscribe added to your DataLayer. In the screenshot, you can see the Varify event inserted at the bottom.
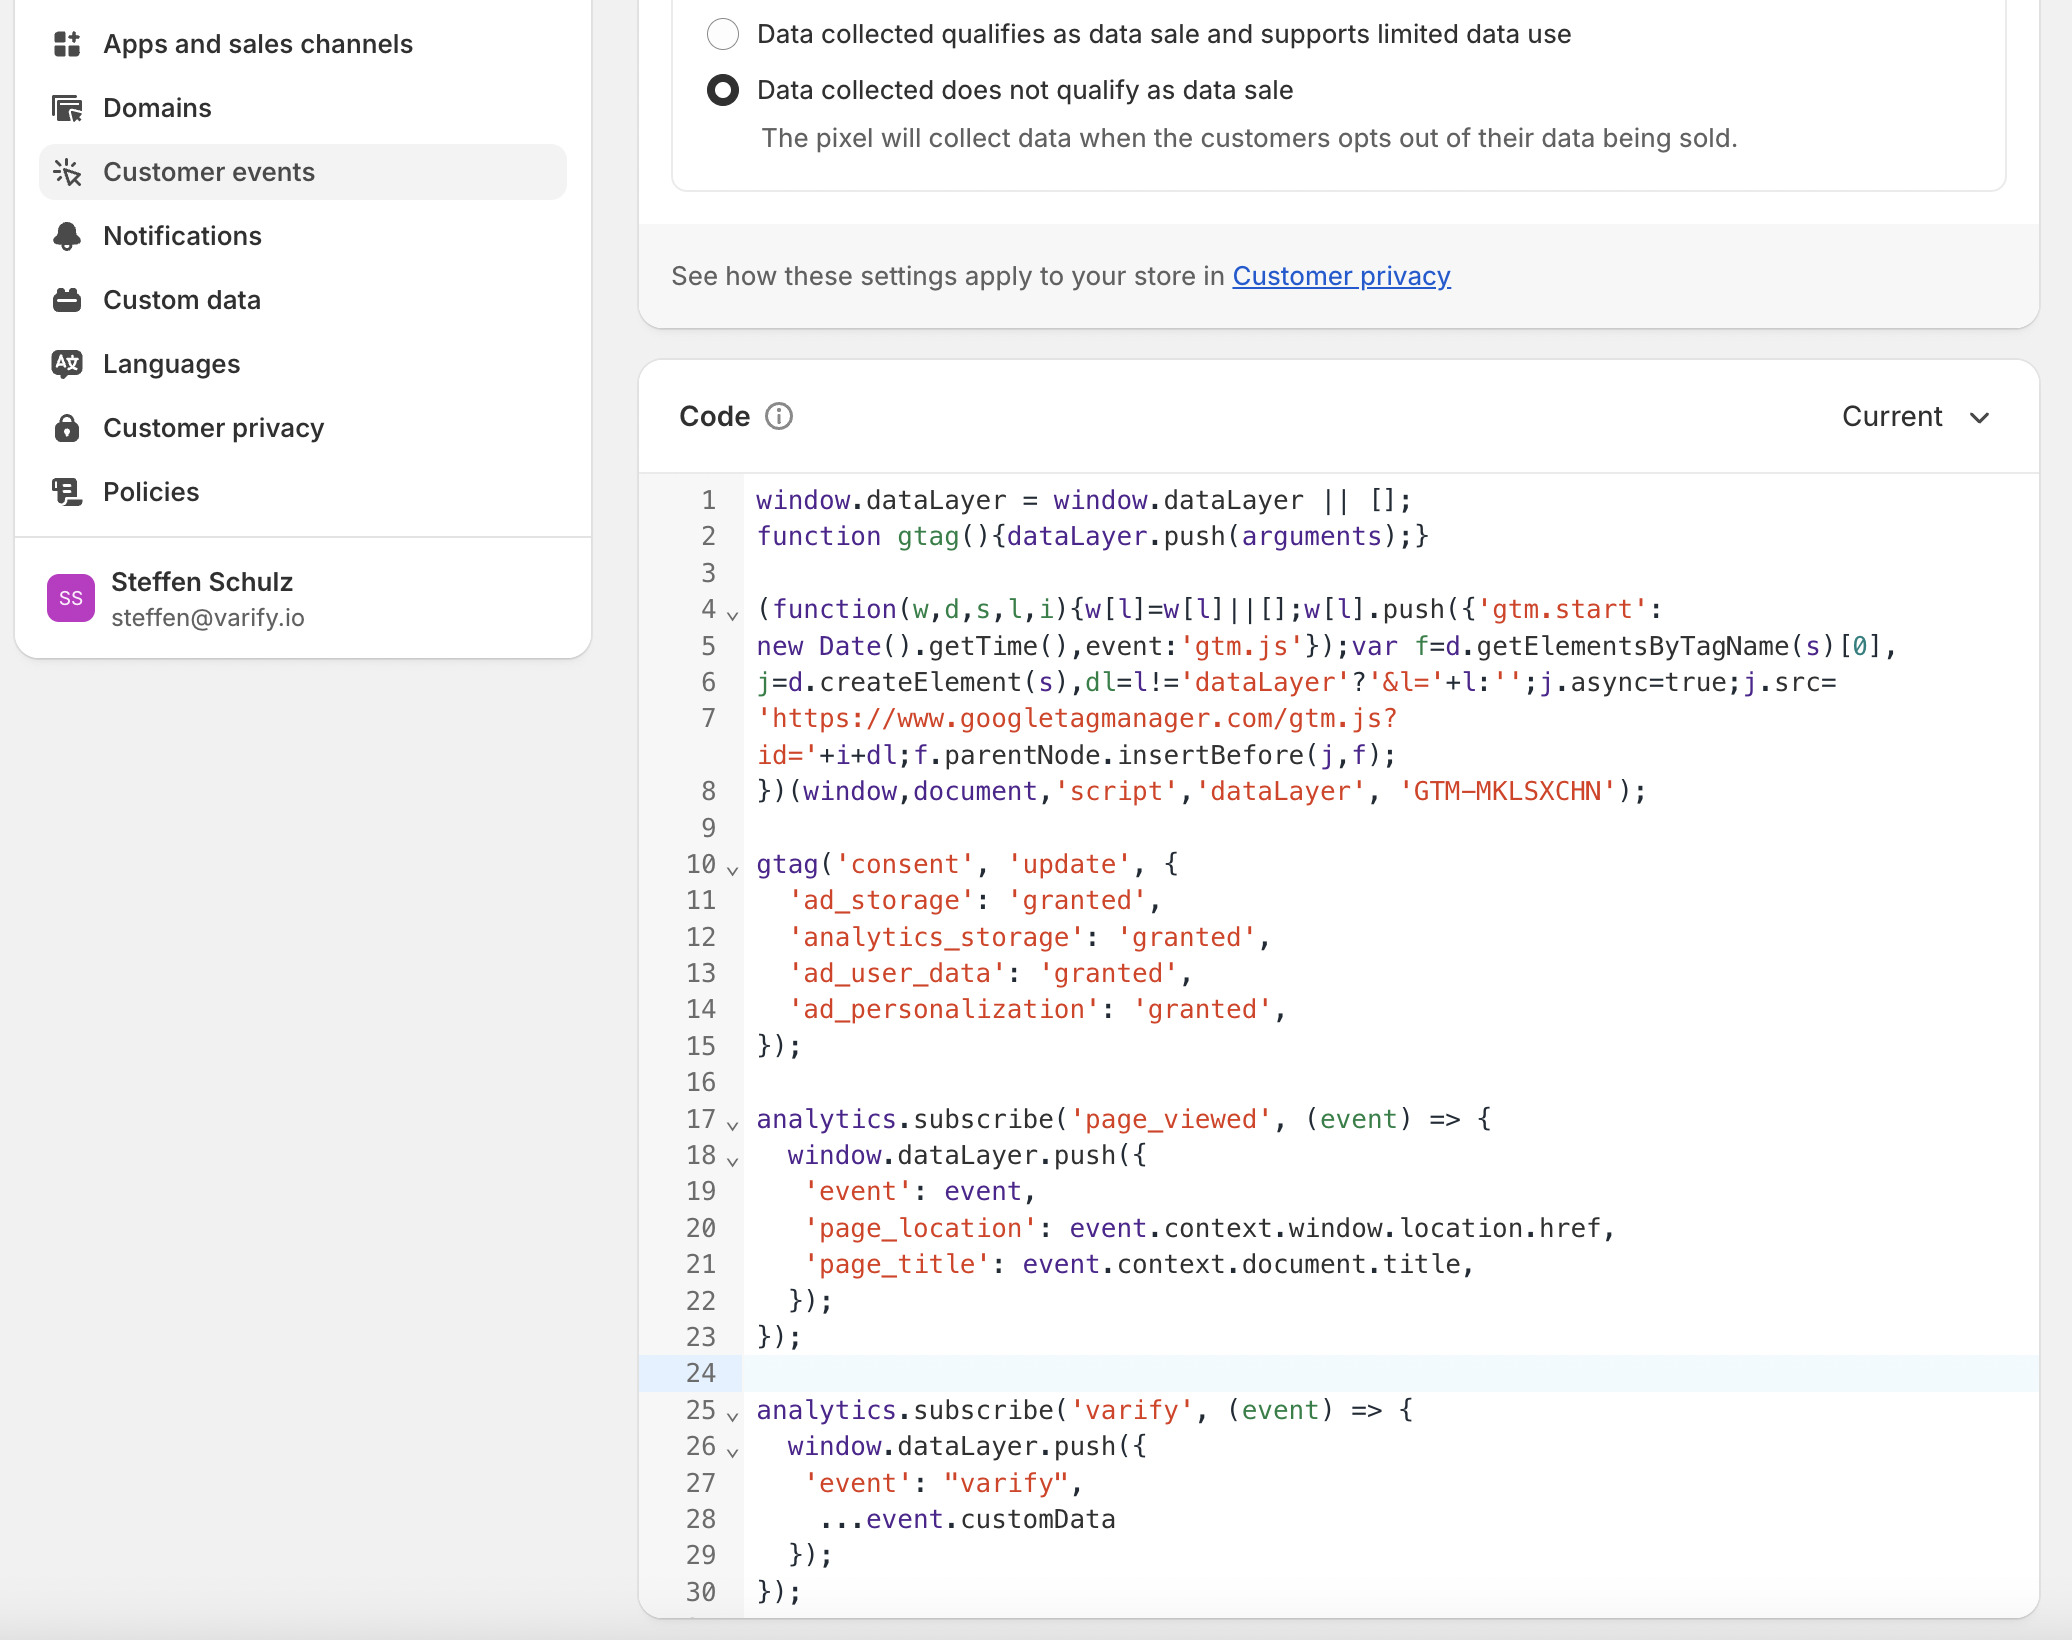
Add the following code to your Custom Pixel below the Google Tag Manager code:
					analytics.subscribe('varify', (event) => {
  window.dataLayer.push({
   'event': "varify",
    ...event.customData
  });
});
Step 3: Deactivating the "Start Tracking on Activation Event" option
Go to "Advanced Setup" under "Tracking Options". Deactivate the "Start Tracking on Activation Event" option.
Step 4: Setting up the Google Tag Manager
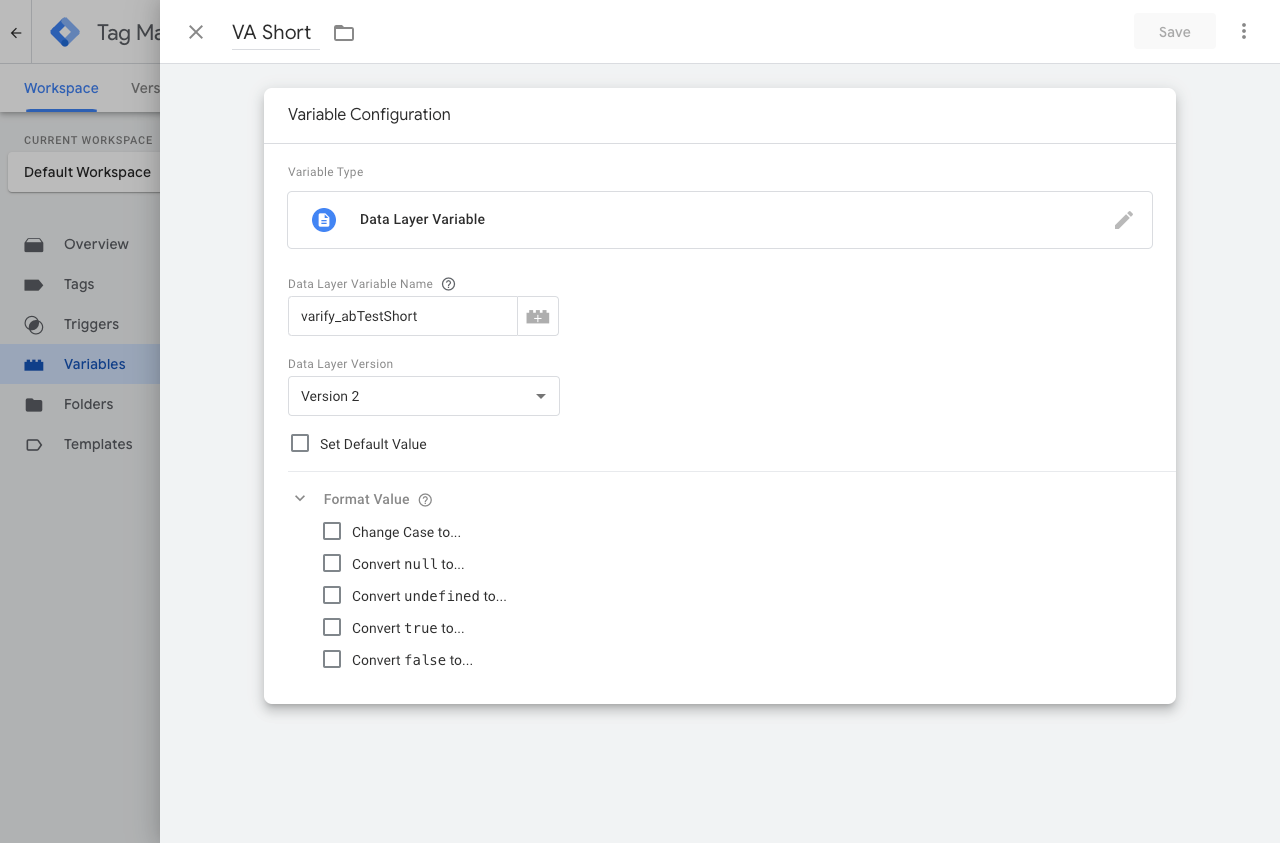
1. creation of a new data layer variable (VA Short)
This variable is used to provide a tag with the information of the A/B test.
- Create a new variable: "Variables" > "New"
- Variable type -> "Data Layer Variable"
- Data Layer Variable Name ->
varify_abTestShort(spelling obligatory) - Name the variable -> VA Short
2. create a new trigger (Varify.io - Event)
The trigger is the decisive event that triggers the transmission of data to the Analytics system.
- Name of the trigger: e.g. "Varify.io - event"
- Trigger type: "User-defined event"
- Event name:
varify(spelling obligatory)

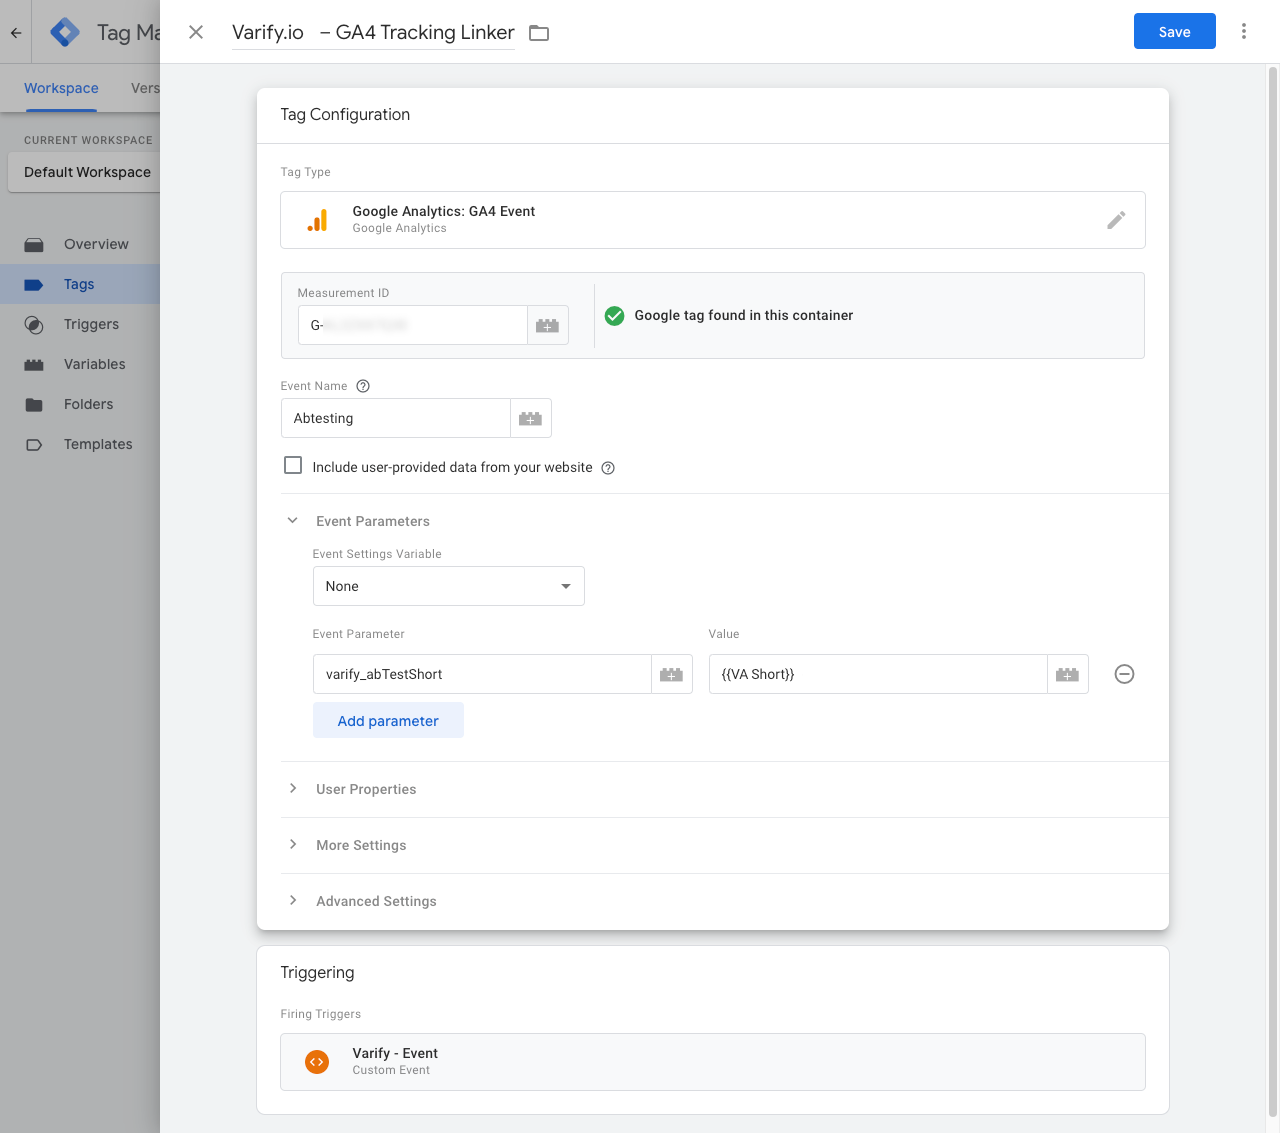
3. creation of a new GTM tag (Varify.io - GA4 Tracking Linker)
Tags are code snippets that send the values stored in the variables to your analytics tool, such as Google Analytics. Now create a sochles tag to send the values of the created variable to Google Analytics.
- Name of the tag: "Varify.io - GA4 Tracking Linker"
- Configuration tag: [use your existing GA4 tag].
- Event name: e.g. "Abtesting"
- Parameter name:
varify_abTestShort(Mandatory spelling) - Values:
{{VA Short}}(The variable created in step 1) - Trigger: "Varify.io - event" (The trigger created in step 2)
4. publish GTM Container
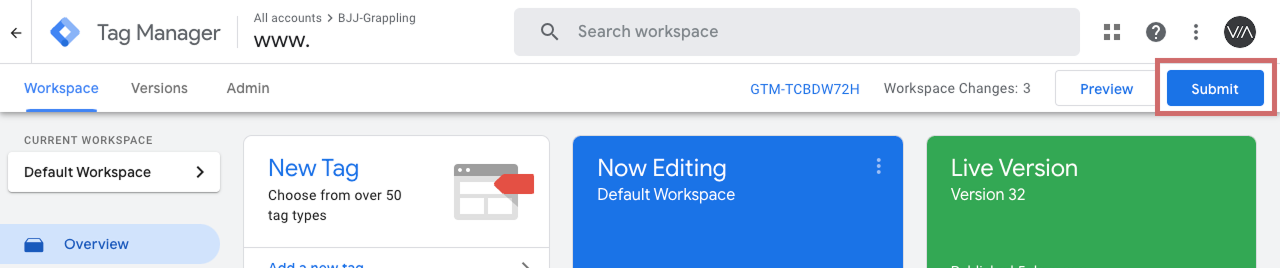
To ensure that your adjustments in Google Tag Manager also work on your website, it is important to publish the changes.
To do this, go to "Overview" in the Tag Manager on the left. Here you can see an overview of all the elements you have just created.
To publish, click on the blue "Publish" button at the top right and confirm. The tag is now live and sends the data to your Google Analytics.
Option 2: GA4 direct integration
Follow the steps in this guide if you have integrated the gtag in your Shopify Custom Pixel (if you send data directly to Google Analytics 4)
Step 2: Add the varify analytics.subscribe function in the custom pixel of the gtag
Call up the “Customer events” area in the Shopify backend and open the custom pixel in which you have integrated your gtag.
The Varify event is created using the analytics.subscribe added to your DataLayer. In the screenshot, you can see the Varify event inserted at the bottom.
Add the following code to your Custom Pixel below the Google Tag Manager code:
					// Start Varify subscribe event
analytics.subscribe("varify", (event) => {
  const d = event?.customData || {};

  gtag("event", "varify", {
    storageType: d.storageType,
    teamId: d.teamId,
    varify_abTest: d.varify_abTest,
    varify_abTestLong: d.varify_abTestLong,
    varify_abTestShort: d.varify_abTestShort,
    varify_error: d.varify_error,
    varify_experimentId: d.varify_experimentId,
    varify_experimentName: d.varify_experimentName,
    varify_success: d.varify_success,
    varify_variationId: d.varify_variationId,
    varify_variationName: d.varify_variationName
  });
});
// End Varify subscribe event
Step 3: Deactivating the "Start Tracking on Activation Event" option
Go to "Advanced Setup" under "Tracking Options". Deactivate the "Start Tracking on Activation Event" option.