Archive experiments
Table of contents
In short
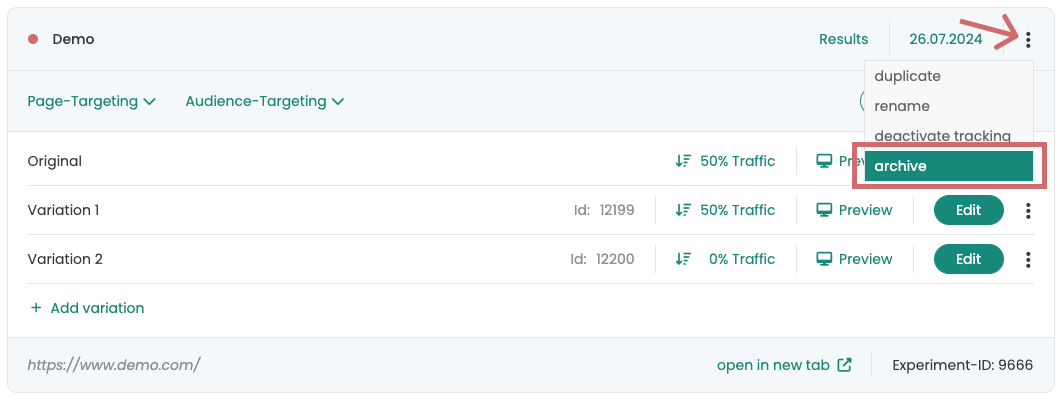
"Old" experiments that are no longer required can be archived with a single click. This keeps your dashboard clear and tidy. To archive an experiment, click on the three dots at the top right of the experiment and select "archive".
Note: Archived experiments are no longer delivered and cannot be restarted. The associated GA4 audiences are archived.
Archive experiments
You can easily archive an experiment using the three dots menu at the top right of the respective experiment.
Click on the three dots and select "archive" button. Your experiment is now archived and disappears from the dashboard view.
Note: If you archive a running experiment, it is automatically stopped and no longer executed.

Why should I archive experiments?
Archiving experiments offers various advantages. It is therefore important to regularly archive experiments that are no longer required.
- GA4 Audience Limit
When an experiment is started, a separate audience is created for each variant in Google Analytics 4 (GA4). The number of active audiences in GA4 is limited to 100. If these 100 slots are full, no further experiments can be started. By archiving experiments that are no longer required, the associated audiences are also archived in GA4, creating space for new audiences.
Clear dashboard
Deleting experiments that are no longer required keeps your dashboard clear and tidy.Improving performance
When an experiment is archived, it is no longer part of the Varify script that is loaded when it is called. This leads to improved performance when playing out the remaining experiments.
What happens to the experiment data/reports?
When you archive an experiment, the following applies to the experiment data:
-
Archiving of audiences in GA4: The associated audiences in Google Analytics 4 are archived. As a result, they no longer collect any new data and cannot be analyzed any further.
-
Storage of the reports in Varify: The reports created in Varify are saved as they were created and can still be called up in archived experiments.
-
No new metrics: New metrics can no longer be added to a report in archived experiments.
Tip: Before archiving, you should make sure that all required metrics have been added to the report to ensure a complete evaluation.
View archived experiments
After you have archived an experiment, it will be removed from the main view of your dashboard. To access all archived experiments, you can use the status filter at the top of the dashboard. To do this, select the "archived" option in the drop-down menu.
If you then select "all" again in the drop-down menu, all non-archived experiments will be displayed.

Restart archived experiments
Experiments that have been archived can no longer be started. However, you have the option of duplicating an archived experiment. To do this, click on the three dots at the top right of the experiment and select "Duplicate".
The duplicated experiment will then appear in your dashboard with new experiment and variant IDs. To display all non-archived experiments again, select the "All" option in the "Status" dropdown.
From there, you can start or adjust the experiment you have just duplicated as usual.


First steps
Tracking & Evaluation
- Tracking with Varify.io
- GA4 reporting in Varify.io
- Segment and filter reports
- Audience-based evaluation in GA4
- Segment-based evaluation in GA 4
- Matomo - Results analysis
- etracker evaluation
- Calculate significance
- User-defined click events
- Evaluate custom events in explorative reports
- GA4 - Cross-Domain Tracking
Web analytics integrations
Further integrations
Create experiment
Expert functions
Visual editor
- Campaign Booster: Arrow Up
- Campaign Booster: Exit Intent Layer
- Campaign Booster: Information Bar
- Campaign Booster: Notification
- Campaign Booster: USP Bar
- Add Link Target
- Browse Mode
- Custom Selector Picker
- Edit Content
- Edit Text
- Move elements
- Hide Element
- Keyword Insertion
- Redirect & Split URL Testing
- Remove Element
- Replace Image
- Responsive Device Switcher
- Style & Layout Changes