Integrations
Table of contents
In short
We have compiled code snippets for common analysis tools that you can use to easily examine your experiments with the corresponding tool.
Integration with the Google Tag Manager
Use this guide if your Varify.io® tracking connection is Google Tag Manager
Since the tracking connection between Varify.io® and Google Tag Manager already exists, we can use the existing setup and integrate additional providers for the analysis. If you have not yet completed the GTM setup, you can find here how to proceed.
Microsoft Clarity
Advantages: With Microsoft Clarity, you can view user sessions for the different variants of your experiments, create heat maps and much more.
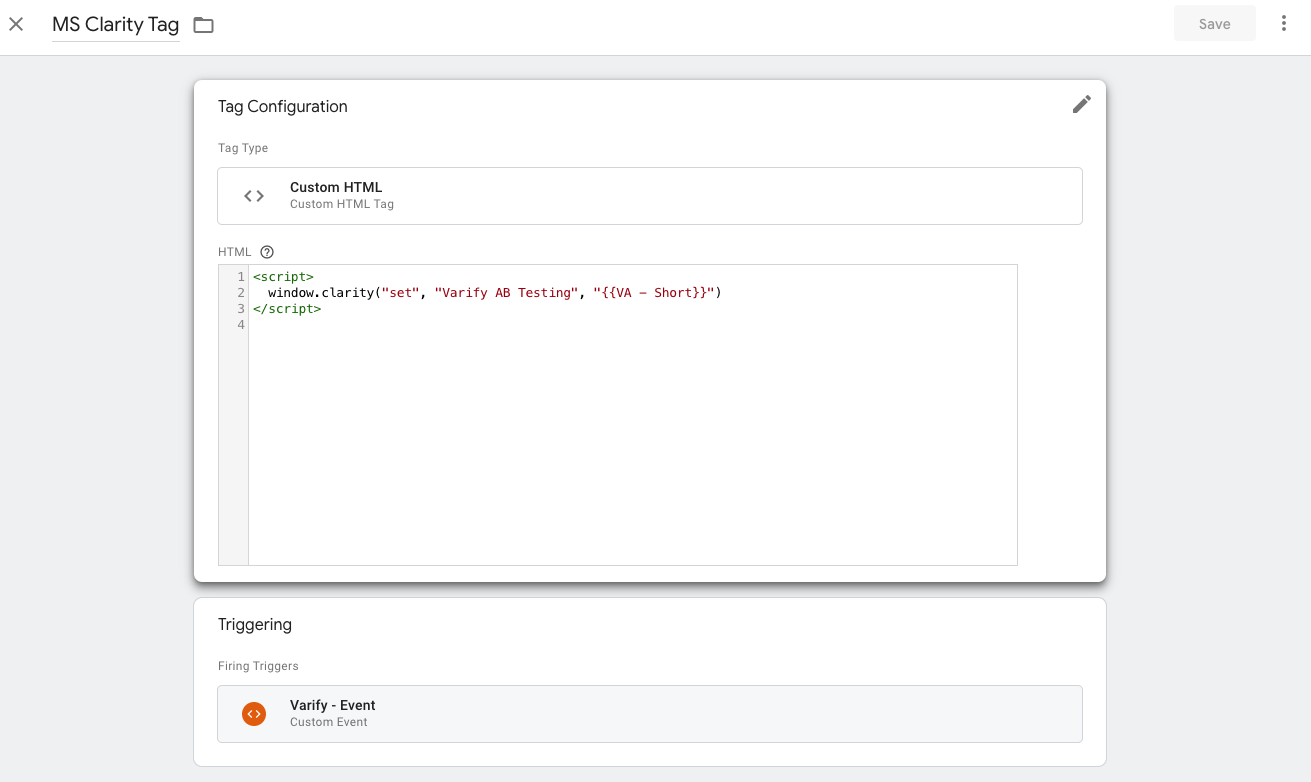
If you are using Google Tag Manager on your website, we recommend that you enter the experiment information via a Custom HTML tag to MS Clarity. This has the advantage that experiments are automatically sent to MS Clarity once the tag has been created.
- Create a custom HTML tag
- Insert the following JavaScript code
- Use the existing trigger "Varify event" as the trigger.
To do this, create a new custom HTML tag and insert the following JavaScript code:
					<script>
  window.clarity("set", "Varify AB Testing", "{{VA - Short}}")
</script>
NoteIf you have not created the "VA - Short" variable for tracking, but use the variables "VA - Experiment" and "VA - Variation", use this code instead:
					<script>
  window.clarity("set", "Varify AB Testing", "{{VA - Experiment}}:{{VA - Variation}}")
</script>
Hotjar
Advantages: Hotjar allows you to view user sessions for the different variants of your experiments, create heatmaps and much more.
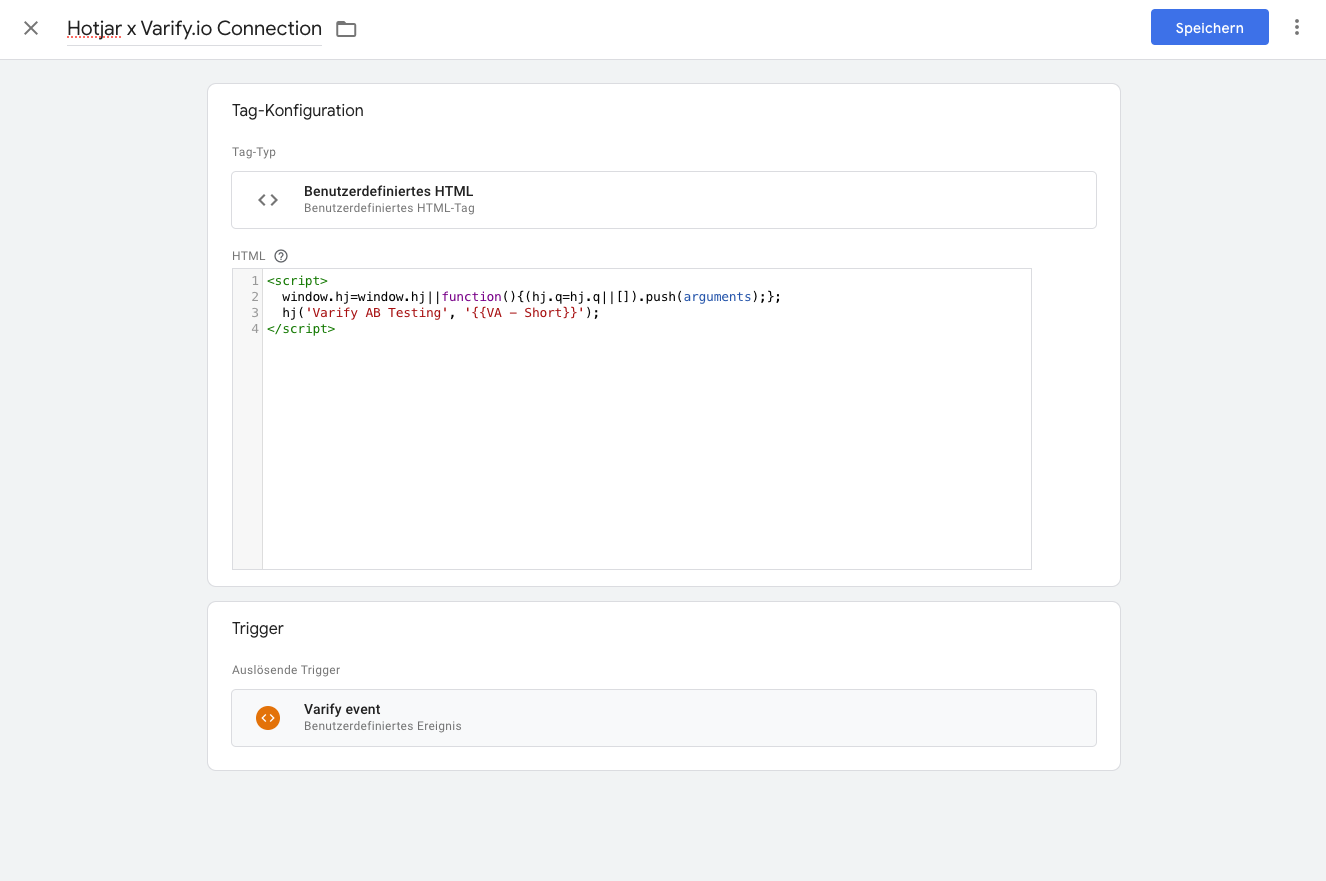
If you are using Google Tag Manager on your website, we recommend that you enter the experiment information via a Custom HTML tag to Hotjar. This has the advantage that experiments are automatically sent to Hotjar once the tag has been created.
- Create a custom HTML tag
- Insert the following JavaScript code
- Use the existing trigger "Varify event" as the trigger.
To do this, create a new custom HTML tag and insert the following JavaScript code:
					<script>
  window.hj=window.hj||function(){(hj.q=hj.q||[]).push(arguments);};
  hj('event', 'Varify - {{VA - Short}}');
</script>
Mouseflow
Advantages: With Mouseflow you can view user sessions for the different variants of your experiments, create heatmaps and much more.
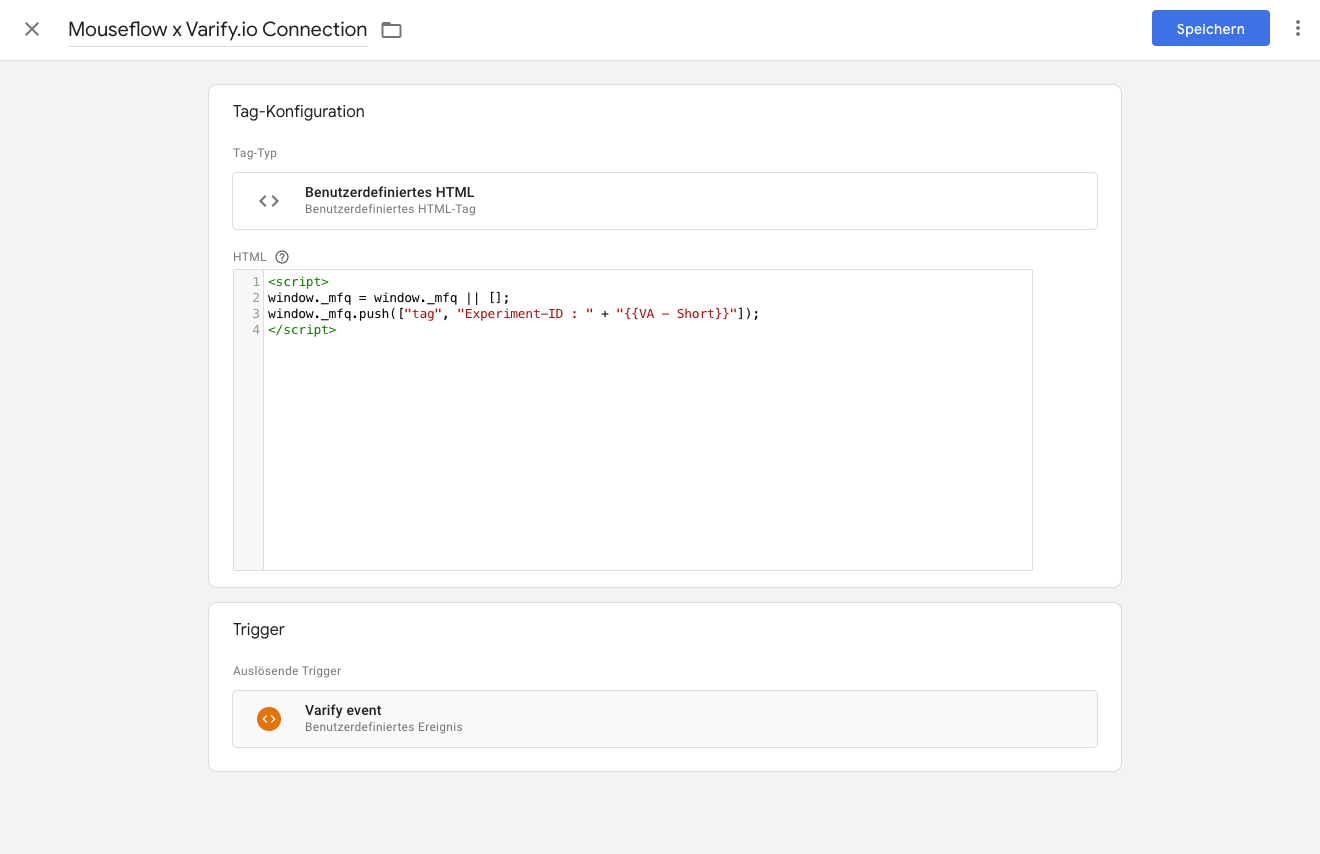
If you are using Google Tag Manager on your website, we recommend that you enter the experiment information via a Custom HTML tag to Mouseflow. This has the advantage that experiments are automatically sent to Mouseflow once the tag has been created.
- Create a custom HTML tag
- Insert the following JavaScript code
- Use the existing trigger "Varify event" as the trigger.
To do this, create a new custom HTML tag and insert the following JavaScript code:
					<script>
window._mfq = window._mfq || [];
window._mfq.push(["tag", "Experiment-ID : " + "{{VA - Short}}"]);
</script>
Contentsquare
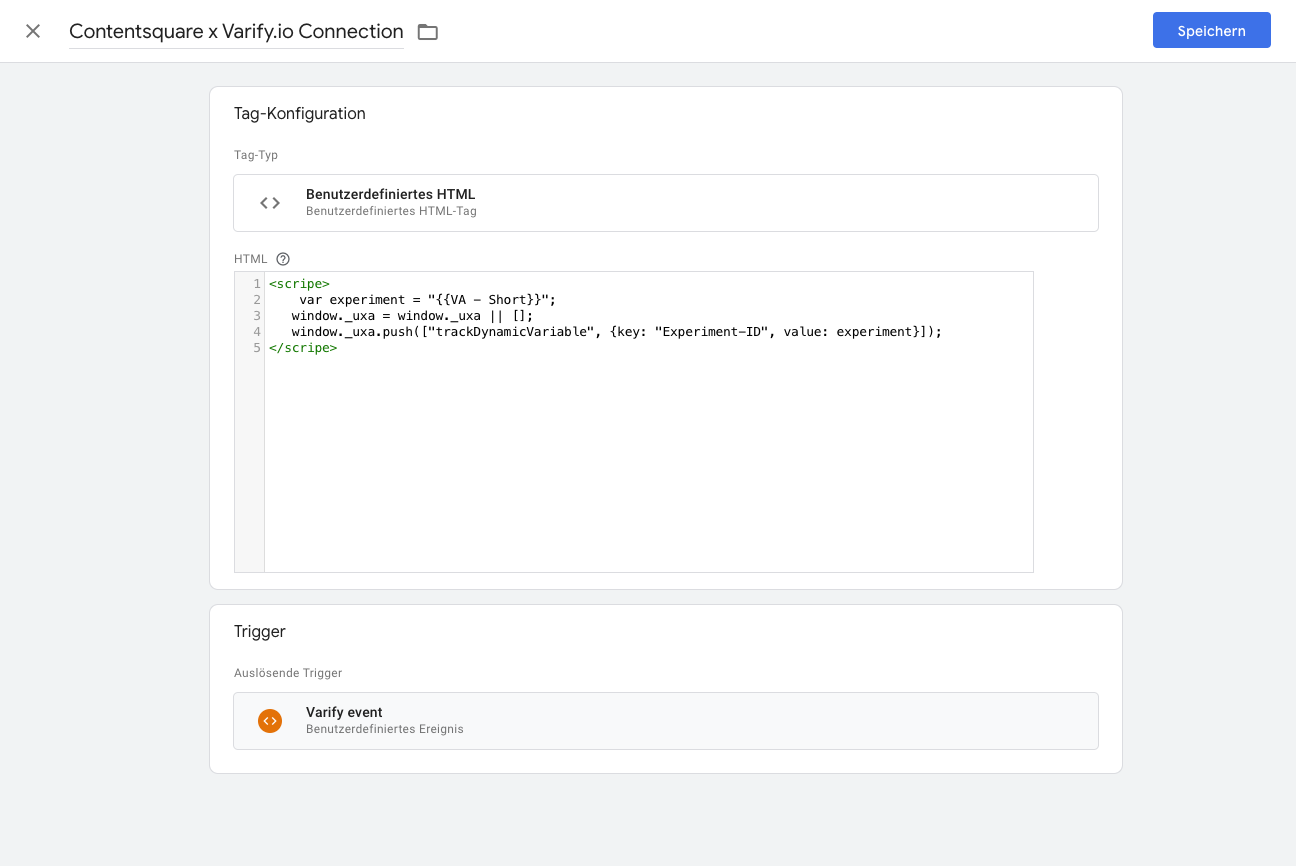
To be able to segment by experiment participants in Contentsquare, you need to add an HTML tag in Google Tag Manager and copy the following JS snippet into it.
The following JavaScript code can be used to send Experiment ID and Variant ID to Contentsquare.
Use the existing trigger "Varify event" as the trigger.
					<script>
    var experiment = "{{VA - Short}}";
   window._uxa = window._uxa || [];
   window._uxa.push(["trackDynamicVariable", {key: "Experiment-ID", value: experiment}]);
</script>
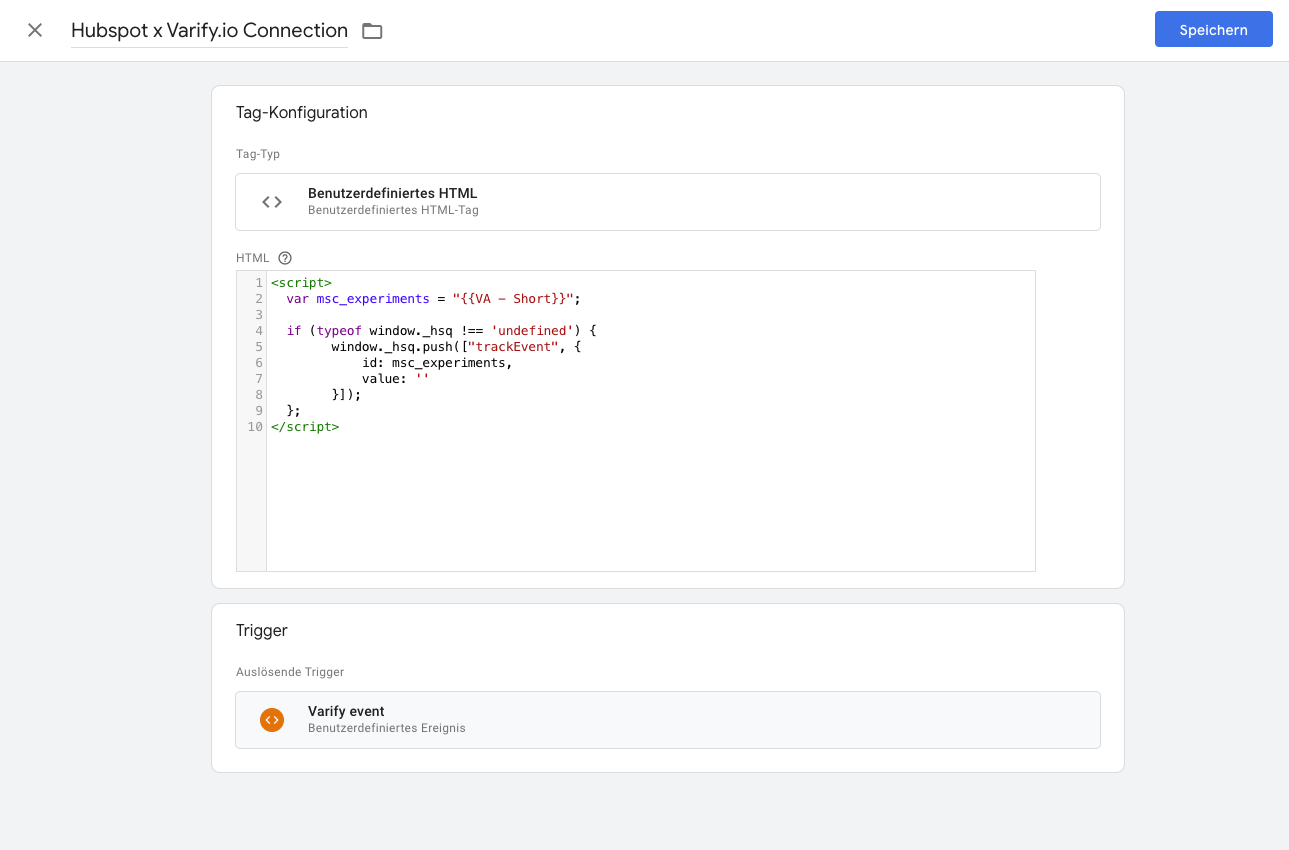
Hubspot (beta)
Advantages: The Hubspot integration allows you to track in Hubspot whether a contact was part of one or more experiments.
The Hubspot subscription "Marketing Hub Enterprise" is required to use this integration. The experiment information is transferred via a Custom HTML Tag sent to Hubspot.
- Create a custom HTML tag
- Insert the following JavaScript code
- Set the existing trigger "Varify event" as the trigger.
To do this, create a new custom HTML tag and insert the following JavaScript code:
					<script>
  var hs_experiments = "{{VA - Short}}";

  if (typeof window._hsq !== 'undefined') {
        window._hsq.push(["trackEvent", {
            id: hs_experiments,
            value: ''
        }]);
  };
</script>
Temporary tool integrations
Use this guide if you do not have access to Google Tag Manager
To track temporary experiments with additional analysis tools, you can proceed as described in the following steps. The advantage is that no Google Tag Manager setup is necessary, everything can be done within Varify.io®. The disadvantage: Each variant must be tagged individually.
MS Clarity
Send experiments to MS Clarity without Google Tag Manager
To be able to segment by experiment participants in MS Clarity, you must insert a code snippet in Add JavaScript of the corresponding variant.
The following JavaScript code can be used to send Experiment ID and Variant ID to MS Clarity.
Important: Exchange the Experiment ID and Varaition ID according to the experiment (line 1 and 2).
					var experimentId = 1234;
var variationId = 4567;
// Tagging a session in MS Clarity with experiment and variation IDs
if (typeof window.clarity === 'function') {
    window.clarity("set", "Experiment-ID:" + experimentId, "Variation-ID:" + variationId);
} else {
    console.log("Clarity is not available.");
}
Mouseflow
To have the possibility to segment by experiment participants in Mouseflow, you have to insert a code snippet in Add JavaScript of the corresponding variant.
The following JavaScript code can be used to send the experiment ID to Mouseflow.
Important: Replace the experiment ID according to the experiment (line 1).
					var experimentId = 1234;
// Tagging a session in Mouseflow with experiment ID
window._mfq = window._mfq || [];
window._mfq.push(["tag", "Experiment-ID : " + experimentId]);
Hotjar (beta)
To be able to segment by experiment participant in Hotjar, you must insert a code snippet in Add JavaScript of the corresponding variant.
The following JavaScript code can be used to send Experiment ID and Variant ID to Hotjar.
Important: Exchange the Experiment ID and Varaition ID according to the experiment (line 1 and 2).
					var experimentId = 1234;
var variationId = 4567;
// Tagging a session in Hotjar with experiment and variation IDs
window.hj = window.hj || function() { (hj.q = hj.q || []).push(arguments); };
hj('tagRecording', ["Experiment-ID : " + experimentId, "Variation-ID : " + variationId]);
Contentsquare
To be able to segment by experiment participants in Contentsquare, you must insert a code snippet in Add JavaScript of the corresponding variant.
The following JavaScript code can be used to send Experiment ID and Variant ID to Contentsquare.
Important: Exchange the Experiment ID and Varaition ID according to the experiment (line 1 and 2).
					var experimentId = 1234;
var variationId = 4567;
// Tagging a session in Contentsquare with experiment and variation IDs
window._uxa = window._uxa || [];
window._uxa.push(["trackDynamicVariable", {key: "Experiment-ID : " + experimentId, value: "Variation-ID : " + variationId}]);
First steps
Tracking & Evaluation
- Tracking with Varify.io
- GA4 reporting in Varify.io
- Segment and filter reports
- Audience-based evaluation in GA4
- Segment-based evaluation in GA 4
- Matomo - Results analysis
- etracker evaluation
- Calculate significance
- User-defined click events
- Evaluate custom events in explorative reports
- GA4 - Cross-Domain Tracking
Web analytics integrations
Further integrations
Create experiment
Expert functions
Visual editor
- Campaign Booster: Arrow Up
- Campaign Booster: Exit Intent Layer
- Campaign Booster: Information Bar
- Campaign Booster: Notification
- Campaign Booster: USP Bar
- Add Link Target
- Browse Mode
- Custom Selector Picker
- Edit Content
- Edit Text
- Move elements
- Hide Element
- Keyword Insertion
- Redirect & Split URL Testing
- Remove Element
- Replace Image
- Responsive Device Switcher
- Style & Layout Changes